Polski
  English
  Português
  Español
  Français
  Deutsch
  Türkçe
  Magyar
Whether you’re looking to tweak your settings for that extra competitive edge or just want to make your game look better, creating and customizing a CS2 autoexec file can be a total game-changer. We’ll walk you through how to set one up, share lots of useful commands you can try, and even help you troubleshoot when things go sideways. Let’s get your CS2 autoexec up and running!
Contents
What is an Autoexec in CS2?
An autoexec in CS2 is a custom configuration file that automatically executes specific commands every time you launch the game. It’s a handy way to save your preferred settings, like keybindings, sensitivity, or crosshair options, so you don’t have to manually adjust them each time you play.
By placing your commands in the autoexec.cfg file, you can ensure your game starts with your personalized setup every time. You can also use the autoexec file to easily transfer your settings to any computer running CS2, which is useful when you’re going to play on someone else’s PC, for instance.
How to Create a CS2 Autoexec
Creating an autoexec file for CS2 is pretty straightforward, and here’s how you can do it, step by step!
First, open the Notepad app. Other text editors can work, too, but Windows’ default Notepad is the simplest and most reliable tool for this task. Write or paste in your commands.
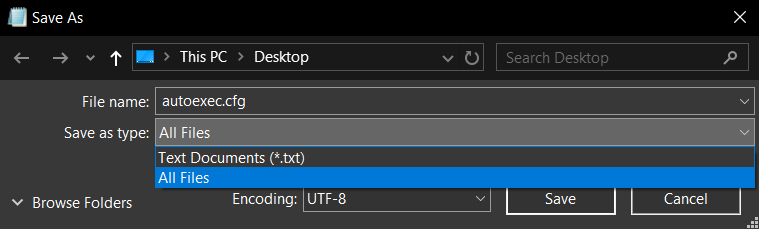
When you’re ready, save your file as autoexec.cfg. Notepad saves files as .txt by default, but there’s an easy way to switch to the .cfg file type:
- Click File → Save as
- In the “Save as type” dropdown, select “All Files” (this is important: otherwise, your file will be saved as a .txt, and the autoexec won’t work)
- Name the file autoexec.cfg and hit “Save”
Lastly, place your file in the correct folder:
C:/Program Files (x86)/Steam/steamapps/common/Counter-Strike 2/game/csgo/cfgAnd you’re done!
Another way to create the right type of file for an autoexec is to copy and edit an existing config file:
- Go to C:/Program Files (x86)/Steam/steamapps/common/Counter-Strike 2/game/csgo/cfg
- Make a copy of one of the .cfg files in that folder (it doesn’t matter which one)
- Rename the file to “autoexec”
- Open the file and remove all contents
- Write or paste in your commands
- Save
It doesn’t matter which method you use: as long as your file is named “autoexec”, the file type is .cfg, and it’s placed in the right folder, you’ll be good to go!
CS2 Autoexec Location
The default directory for your config files, including autoexec, is:
C:/Program Files (x86)/Steam/steamapps/common/Counter-Strike 2/game/csgo/cfg
If you’re having trouble locating your game files, you can open your game’s directory via Steam:
- Find Counter-Strike 2 on your list of games in the Steam Library
- Right-click the title
- Choose Manage → Browse local files
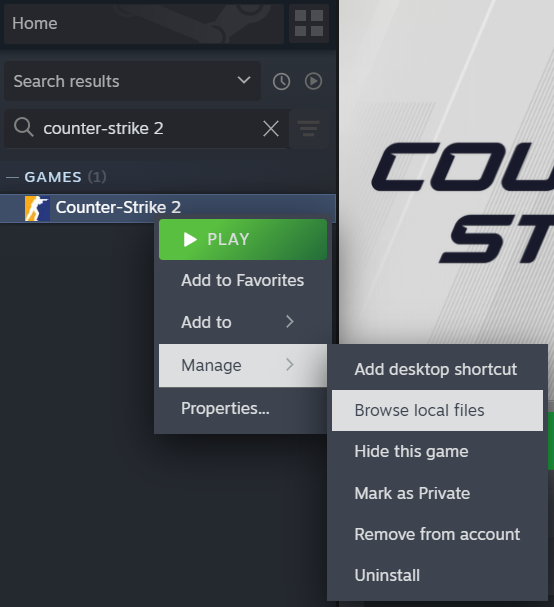
This will open your game’s main folder: C:/Program Files (x86)/Steam/steamapps/common/Counter-Strike 2/. Once there, open the folder named “game”, then “csgo”, then “cfg”. This is where your autoexec file should go!
What to Include in Your Autoexec
To prevent common errors, including mouse movement issues, it’s recommended to start your list of commands with:
unbindallAnd add the following to your autoexec:
bind "mouse_x" "yaw"
bind "mouse_y" "pitch"
End your autoexec with this command:
host_writeconfigIf you want to add text to your autoexec that isn’t a command (say, a comment or a heading to organize your file better), do so by starting it with two forward slashes //, for example:
// Crosshair OptionsEverything else is up to you: you can add any console command to your autoexec, and it should execute automatically. Note that in the autoexec, values in commands need to be in quotation marks, for example:
sensitivity "2.5"We’ve included a list of useful commands below, so check these out!
Autoexec Launch Option
According to some sources, a launch option is needed for the autoexec to run. Launch options are additional commands with settings that you can input in Steam. In general, the game should execute the autoexec automatically (that’s kind of the point of an autoexec!) without the need for a special launch option.
Still, you may want to add the launch option anyway, especially if you’re having trouble getting your autoexec to run. Here’s how to do that:
- Open your Steam Library
- Right-click on Counter-Strike 2 on your list of games
- Choose “Properties”
- In the “Launch Options” field, paste “+exec autoexec.cfg” (without the quotes)
This shouldn’t be necessary if your file is named “autoexec”, but it is useful for config files with a different name, or when you’re running several configs. Say your config file was named “myoptions”: it would then make sense to use the launch option “+exec myoptions.cfg”, since the game wouldn’t execute this file automatically.
For more information, visit our dedicated guide to launch options in CS2!
Best CS2 Autoexec Commands
Below are the most useful autoexec commands to consider adding to your file.
Movement Binds
Note on scancodes: It used to be the case that movement binds would just have the name of the key you wanted to bind to an action. For example, bind w "+forward" would bind the action of moving forward to the W key. However, since the February 2024 update, commands have to use scancodes instead of key names. Each key has a scancode assigned to it, and you can find the full list of scancodes here.
bind "scancode26" "+forward" – Binds moving forward to the W key. Change "26" to another number from this list to pick a different key

bind "scancode4" "+left" – Binds strafe left to the A key

bind "scancode7" "+right" – Binds strafe right to the D key

bind "scancode22" "+back" – Binds stepping backwards to the S key

bind "scancode44"  "+jump" – Binds jumping to the Space key
Grenade Binds
Replace # with the scancode number of your chosen key (full list here). For example, the command bind "scancode16" "slot6" will cause the HE grenade to be equipped when you press the M key.
bind "scancode#" "slot5" – Equip C4 Explosive or Medi-Shot

bind "scancode#" "slot6" – Equip High Explosive Grenade

bind "scancode#" "slot7" – Equip the Flashbang Grenade

bind "scancode#" "slot8" – Equip the Smoke Grenade

bind "scancode#" "slot9" – Equip the Decoy Grenade

bind "scancode#" "slot10" – Equip the Incendiary Grenade or Molotov
Mouse Sensitivity
Use these to adjust your mouse sensitivity settings:
sensitivity "#" – Sets the mouse sensitivity to the specified value (replace # with your chosen sensitivity level)

zoom_sensitivity_ratio "#" – Sets the zoom sensitivity to the specified value
Read more: Best CS2 Sensitivity Settings
Crosshair Settings
Replace # with your chosen values:
cl_crosshairsize "#" – Sets the crosshair size to the specified value

cl_crosshairdot "1" – Enables the dot in the center of the crosshair

cl_crosshairdot "0" – Disables the dot in the center of the crosshair

cl_crosshairthickness "#" – Changes the thickness of the dot in the center of the crosshair

cl_crosshair_drawoutline "1" – Enables the outline around the crosshair

cl_crosshair_drawoutline "0" – Disables the outline around the crosshair

cl_crosshair_outlinethickness "#" – Sets the thickness of the outline

cl_crosshairalpha "#" – Changes the transparency of your crosshair. Replace # with a value from 0 (invisible) to 250. The default alpha value is 200

cl_crosshaircolor "0" – Red crosshair

cl_crosshaircolor "1" – Green crosshair

cl_crosshaircolor "2" – Yellow crosshair

cl_crosshaircolor "3" – Dark blue crosshair

cl_crosshaircolor "4" – Cyan (light blue) crosshair
Read more: Best CS2 Crosshairs
Viewmodel Settings
These commands adjust your field of view and the position of your viewmodel (your character’s weapon and hands):
viewmodel_fov "#" – changes your FOV (field of view). Replace # with a value between 54 and 68

viewmodel_offset_x "#" – Sets the horizontal position of your viewmodel. Replace # with a value between -2.5 (left) and 2.5 (right)

viewmodel_offset_z "#" – Sets the vertical position of your viewmodel (up and down). Replace # with a value between -2 (lower) and 2 (higher)

viewmodel_offset_y "#" – Changes how far the viewmodel appears. Replace # with a value between -2 (closer) and 2 (farther)
Read more: CS2 Viewmodel Guide & Commands
Radar Settings
You can use these commands to change the scaling, behavior, and appearance of your radar (mini-map):
cl_hud_radar_scale "#" – Sets the size of the radar in relation to other HUD elements. Replace # with a number between 0.8 and 1.3 (the default value is 1)

cl_radar_always_centered "0" – Turns off the default setting that centers the radar around you. This can help you see more of your surroundings on the radar

cl_radar_icon_scale_min "#" – Adjusts how large your character dot appears on the radar. Replace # with a value between 0.4 and 1 (the default is 0.6)

cl_radar_rotate "0" – Disables the default setting that causes the radar to rotate with the player: with this command, the radar will always face North

cl_radar_scale "#" – Map zoom. Set to a value between 0.25 and 1 (the default is 0.7)

cl_radar_square_with_scoreboard "0" – Prevents the radar from turning into a square when you open the Leaderboard
HUD Settings
These commands change some aspects of your HUD and other information displayed during gameplay:
hud_scaling "#" – Adjusts the size of your HUD. Change # to 0.9 for a smaller HUD and 1.1 for a larger HUD (the default value is 1).

cl_showfps "1" – Shows FPS during gameplay

cl_sanitize_muted_players "1" – Hides the names and avatars of muted players

cl_sanitize_player_names "1" – Hides the names of players who are not on your friends list (good idea for streaming)

cl_hide_avatar_images "2" – Hides the avatars of players who are not on your friends list

cl_allow_animated_avatars "0" – Enables animated avatars (may reduce performance!)

cl_hud_color "#" – Changes the color of your HUD. Replace # with a number from 1 to 10 to switch to one of these colors:

1: White
2: Light Blue
3: Blue
4: Purple
5: Red
6: Orange
7: Yellow
8: Green
9: Aqua
10: Pink
If you want to hide your HUD altogether, check out this guide: How to Hide HUD in CS2
CS2 Autoexec Not Working: Troubleshooting
If your autoexec isn’t working, don’t worry: it’s definitely fixable. Try the following steps to fix your autoexec—they address the most commonly occurring issues.
Make Sure Your Autoexec is a .cfg File
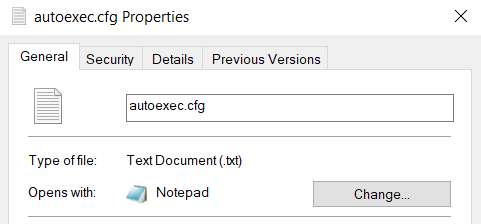
When saving your autoexec using Notepad or another text editor, it’s easy to accidentally save it as a .txt file. .txt is the default file format for Notepad and similar apps, but it won’t work for our purposes: the autoexec has to be a .cfg file in order for the game to recognize it as a configuration file.
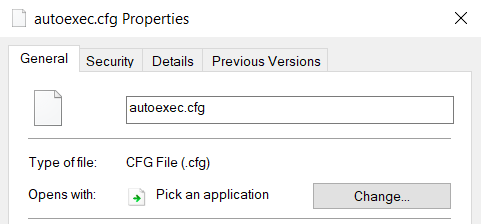
To check the file type of your autoexec, right-click on the file and choose “Properties”. Look at the “Type of file”—if it says “Text document (.txt), then your file is using the wrong format. In the “Details” tab, you’ll also see your file’s name listed as “autoexec.cfg.txt”.
To fix the problem, you’ll need to change the file type to .cfg. Here’s how to do that:
- Open the file in Notepad
- Go to File → Save as
- Click the Save as type dropdown and choose “All files”
- Make sure that the File name field still says “autoexec.cfg”
- Click “Save”
This will create a new file that should now be a .cfg—double check by going to its Properties.
After you’ve placed the .cfg file in the correct location, it should run automatically when you launch the game.
Check the Location
There used to be two “cfg” folders in the game’s directory, causing a lot of confusion (and autoexec problems). A 2024 update tidied up the file structure and now this shouldn’t be the case anymore, but it’s still possible that you’ve accidentally placed the file in the wrong folder.
The path for the correct folder is:
C:/Program Files (x86)/Steam/steamapps/common/Counter-Strike 2/game/csgo/cfg
Double-check that your file is correctly named, has a .cfg file type, and that it’s located in this folder.
Update Your Autoexec Commands
Go through the commands in your autoexec and make sure that there are no spelling errors or other inconsistencies. Even small things like an extra space or dash will cause the command to fail.
If you’re still using your old CS:GO autoexec file, it may not work correctly with CS2. Use a converter like this one to make your autoexec CS2-friendly, or create a new one from scratch if you want to be 100% on the safe side.
Alright, that’s all we have for you today! Hopefully, your CS2 autoexec is already set up and helping you jump straight into action every time you launch the game. Have a great time on Key-Drop, see you on the battlefield!